![]()
![]()


![]()


Please Call (702) 324-6463 or email sales@nitevis.com
|
|
|
Categories |
||||||||||||||||||||||||||||||||||||||||||||||||||||||||||||||||||||||||||||||||||||||||||||||||||||||||||||||||||||||||||||||||||||||||||||||||||||||||||||||||||||||||||||||||||||||||||||||||||||||||||||||||||||||||||||||||||||||||||||||||||||||||||||||||||||||
Helpful Info Export Regulations
|
| ***** ALL PRICES SUBJECT TO CHANGE WITHOUT NOTICE ***** | ||||||||||||||||||||||||||||||||||||||||||||||||||||||||||||||||||||
|
|
||||||||||||||||||||||||||||||||||||||||||||||||||||||||||||||||||||
|
||||||||||||||||||||||||||||||||||||||||||||||||||||||||||||||||||||
|
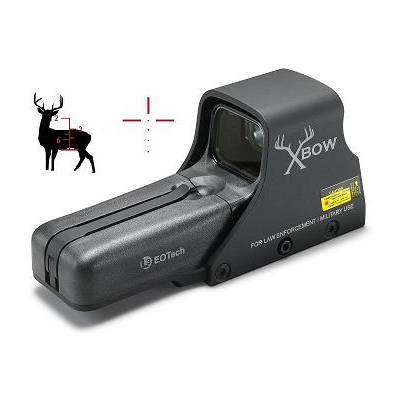
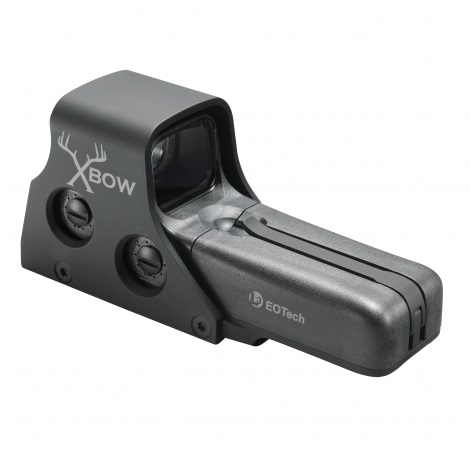
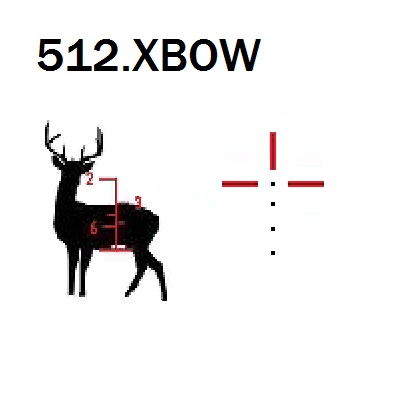
DISCONTINUED EOTech 512.XBOW |
||||||||||||||||||||||||||||||||||||||||||||||||||||||||||||||||||||

|
||||||||||||||||||||||||||||||||||||||||||||||||||||||||||||||||||||
|
|
||||||||||||||||||||||||||||||||||||||||||||||||||||||||||||||||||||
|
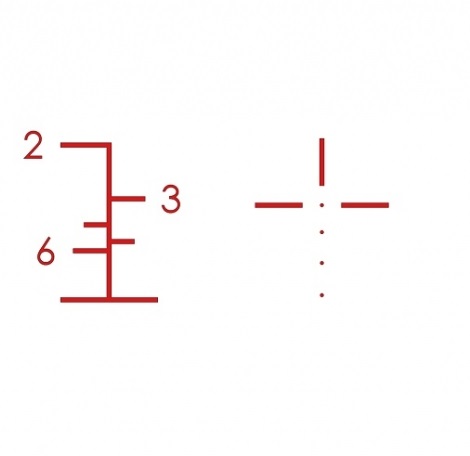
RETICLE
|
||||||||||||||||||||||||||||||||||||||||||||||||||||||||||||||||||||
|
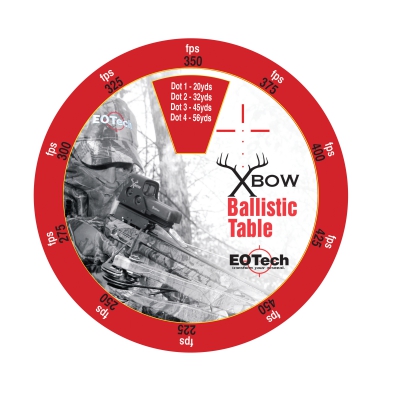
HOW TO USE THE INTEGRAL RANGE FINDER
|
||||||||||||||||||||||||||||||||||||||||||||||||||||||||||||||||||||
|
ZEROING THE SIGHT The top dot must be zeroed at 20 yards for the ballistic calculations to work. To do this, place a target out at 20 yards and safely fire. Adjustments in Windage and Elevation can be made on the right side of the sight. Keep in mind, each click represents 1/2 " adjustment at 100 yards. Once the top dot is zeroed, locate the Ballistic Wheel included in the packaging and align your crossbow speed (fps) with the opening of the window. This will indicate what each of the remaining dots will be zeroed to. To confirm, move to those distances and safely fire. NOTE: Ballistics calculated using 349gr bolt and 100gr field tip. Different variations may affect POI (point of impact). RECORD YOUR BALLISTICS Included in the packaging is a reticle sticker. Once you know your zero for each dot, simply write it down on the sticker and affix it to your crossbow limb for reference. Good luck |
||||||||||||||||||||||||||||||||||||||||||||||||||||||||||||||||||||
|
INTRODUCTION The L-3 EOTech HOLOgraphic Weapon Sight (HWS) is a revolutionary sighting system based on advanced holographic technology. The HWS enhances target acquisition, improves accuracy, and provides more control over your shooting environment. The HWS fills the needs of all shooters from the novice to the most advanced professional. EOTech's objective is to give each and every customer the quality, commitment, and service expected from the sighting industry leader. Kit Includes: Sight assembly 2 x Type N or AA alkaline batteries 7/64" Allen wrench Knurled Weaver® Bolt
BASIC OPERATION The HWS uses laser light to illuminate a holographic reticle pattern embedded in the heads-up display window and forms a virtual image of a reticle pattern. The shooter looks through the heads-up display window and sees a bright red image of a reticle pattern projected onto the target plane. There is absolutely no light projected onto the target plane. The HWS has no magnification. |
||||||||||||||||||||||||||||||||||||||||||||||||||||||||||||||||||||
 These EOTech sights are proudly manufactured in the USA
 |
||||||||||||||||||||||||||||||||||||||||||||||||||||||||||||||||||||
|
* The 512 Models are NOT Night Vision compatible |
||||||||||||||||||||||||||||||||||||||||||||||||||||||||||||||||||||
|
||||||||||||||||||||||||||||||||||||||||||||||||||||||||||||||||||||
|
Night Vision Compatibility: NO
HOOD Models 511, 512, 551, and 552 are equipped with a protective hood. This hood is pre-assembled at the factory and is non-removable. Should your hood require maintenance please contact our Customer Service Department at (702) 324-6463 or email customerservice@nitevis.com CAUTION- Tampering of Hood lock screws will void warranty.
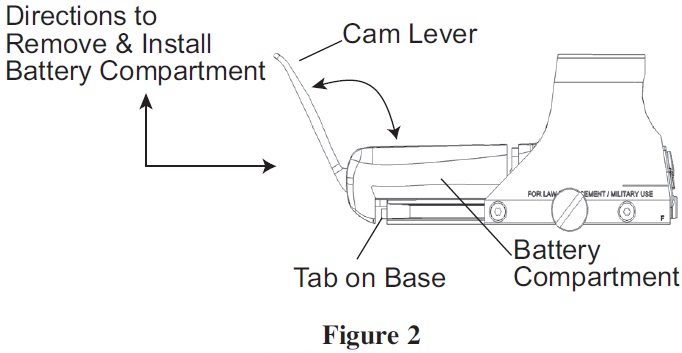
Two (2) commonly available Type N or AA alkaline 1.5 V batteries power your HWS depending on the model. An initial set of batteries comes with your sight. The HWS is designed to maintain constant brightness at a particular setting as the batteries drain down. The reticle brightness will not fade gradually as the batteries run down but rather shut down abruptly. The first indication of the batteries draining is the reticle blinking when the unit is turned on (see Electronic Features 1). Another indication of low batteries is the reticle pattern blinking off and on during recoil. With high recoil guns, this can occur before the battery check indicates low battery condition. If the reticle pattern blinks off and on during recoil or turns off suddenly, replace the batteries. Please read and follow the battery replacement and battery check procedures described in your user Operator's Manual. Alkaline batteries from different manufacturers are not all constructed the same way. Tests show some brands are more susceptible to degradation by the shock of recoil. We recommend the use of Eveready Energizer batteries with the HWS. It is always good practice to replace the batteries with a fresh set before a mission. CAUTION-There is a 12 V battery that is approximately the same size as the Type N 1.5 V battery. DO NOT USE 12 V battery. They will severely damage the sight. Two (2) common AA size batteries power your Model 512 HWS. An initial set of AA size alkaline batteries comes with your sight. EOTech recommends using Energizer Alkaline or Lithium AA batteries. Lithium AA batteries offer longer life, particularly at temperatures below freezing. For this reason Lithium AA batteries are recommended for cold weather operations. However, we should note that the battery checking function which is based on the characteristics of Alkaline batteries does not operate properly with Lithium batteries. |
||||||||||||||||||||||||||||||||||||||||||||||||||||||||||||||||||||
|
REPLACING BATTERIES
|
||||||||||||||||||||||||||||||||||||||||||||||||||||||||||||||||||||
|
ELECTRONIC FEATURES
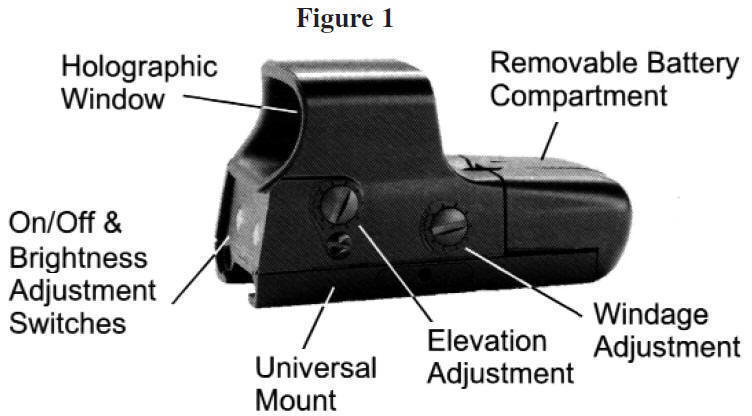
All electronic controls are via push-button switches located at the rear of the unit housing as shown in Figures 1. To ensure proper operation of the push button switches we recommend pressing firmly on the center of the switch. 1. ON/ Auto-Battery Check Depressing the Up or Down Arrow push-button switches will turn the sight ON at Level 12. See step 4 under this section for description of Auto shutdown. The sight will automatically perform a battery check every time it is turned on. If the batteries have less than 20% of life left, the sight will turn on with the reticle image blinking on and off for 5 seconds. If the remaining battery life is more than 20%, the sight will turn on with a steady reticle pattern. The battery condition can be checked any time by turning the sight off and back on. 2. OFF To turn the sight off depress both UP and DOWN arrows simultaneously. Verify by looking through heads-up display window. 3. Brightness Adjustment Push-button switches vary the brightness intensity of the holographic reticle pattern. Depressing and releasing the push-button switches moves the brightness level UP or DOWN one (1) step from the previous setting. Depressing and holding the up arrow or down arrow switch will change brightness level up or down continuously in steps. There are twenty (20) brightness settings providing a dynamic range of 146,000:1 from the lowest setting to the highest setting. 4. Auto Shutdown The HWS is equipped with auto shutdown capability. If the sight is turned on by depressing the UP button, it will automatically shut itself OFF 8 hours after the last push-button control is used. The sight will automatically shut OFF after 4 hours if it is turned on by depressing the DOWN button. |
||||||||||||||||||||||||||||||||||||||||||||||||||||||||||||||||||||
|
WINDAGE AND ELEVATION ADJUSTMENTS
Your HWS features click mechanisms for elevation and windage adjustments. The elevation and windage adjustment are located on the Right-hand side of the sight (Figure 1). The knob towards the front is your windage adjustment and the knob towards the rear is your elevation adjustment (Figure 1). Both of these adjustment mechanisms are grooved with a slotted screw head and require the use of a screwdriver, coin, or spent brass to turn. To move the point of impact RIGHT, turn the windage adjustment screw clockwise; to move the point of impact LEFT, turn the windage adjustment screw counterclockwise . The elevation and windage adjustments have been initially set at the factory such that the line of sight to the center of the reticle is parallel to the mounting rail on the weapon. The sight should be close to being at zero with a properly installed mounting rail. Please do not turn the adjustments before mounting the sight on the firearm. Be sure to check that the mount and the sight remain secured after the first shots are fired. CAUTION-When encountering a sudden increase in resistance in these adjustments, the end of the adjustment range has been reached. DO NOT TRY to turn the adjustments any farther or serious damage may occur to the sight. |
||||||||||||||||||||||||||||||||||||||||||||||||||||||||||||||||||||
|
LASER SAFETY ISSUES The HWS is a Class II laser product. The Class II level illuminating beam, however, is completely blocked by the housing. The only laser light accessible to the eye is the image beam and is at a power level within the limit of a Class IIa laser product. The illuminating beam can become accessible to the eye if the housing is broken. Turn the sight off immediately and return the broken unit to the factory for repair. |
||||||||||||||||||||||||||||||||||||||||||||||||||||||||||||||||||||
|
MOUNTING 1. Locate the bolt and locking bar on the underside of the sight. Loosen the bolt and the locking bar with the Allen wrench (7/64") 2. Place the bolt within a groove on the top of the rail. Individual preference and the specific firearm determine the optimal positioning to any specific groove on the rail. 3. Make sure the bolt is inserted fully into the mounts groove and push the sight as far forward as possible. Tighten bolt. NOTE 1: Loosen bolt just enough to mount and dis-mount the sight. NOTE 2: A Picatinny (MIL-STD-1913) rail cannot be installed directly on some weapons. EOTech sells mount adapters to provide a standard Picatinny rail for various weapons used in todays military and law enforcement applications. Contact a factory representative if you are unclear on the mounting adapter you should use on your weapon. |
||||||||||||||||||||||||||||||||||||||||||||||||||||||||||||||||||||
|
BORE SIGHTING AND ZEROING Bore sighting is a good preliminary procedure in achieving proper alignment of your sight to the firearm. If the rail is not mounted parallel to the barrel, major elevation adjustments may be accomplished by shimming the dovetail rail. It is important not to use the elevation adjustment of the sight for major adjustments. Your sights internal elevation and windage adjustments should be reserved for fine-tuning to achieve zero at the called for distance. Final zeroing of your firearm and sight should be done with live ammunition and based on your expected shooting distance. If you anticipate most of your shooting at short range, zero in at 50 yards (45.7m). Groups of three to six shots will be useful for averaging the point of impact.
FCC COMPLIANCE The HWS complies with Part 15 of the FCC Rules. Operation is subject to the following conditions: |
||||||||||||||||||||||||||||||||||||||||||||||||||||||||||||||||||||
|
MAINTENANCE AND CARE Your HWS is a precision instrument that deserves reasonably cautious care. 1. The optical system and the window are coated with anti-reflection material. When cleaning the glass surfaces, first blow away any dirt and dust. Fingerprints and lubricants can be wiped off with lens tissue or a soft cotton cloth, moistened with lens cleaning fluid or glass cleaner sold in any camera store. Never clean the glass surface with a dry cloth or paper towel; always dampen the glass surfaces prior to cleaning 2. All moving parts of the sight are permanently lubricated. Do not try to lubricate them. 3. No maintenance is needed on the sights surface, except to occasionally wipe off with a soft cloth. Use only a water-based cleaner such as glass cleaner, ammonia, or soap and water. Never use any solvent-type cleaner such as alcohol or acetone. 4. Never disassemble the sights optical assembly. The optical cavity is purged, nitrogen filled, and sealed to achieve fog proof performance. Disassembly will void the warranty. |
||||||||||||||||||||||||||||||||||||||||||||||||||||||||||||||||||||
|
REPAIR Send to: L-3 EOTech ATTN: Service Department 1201 E. Ellsworth Road Ann Arbor, MI 48108 USA You can contact EOTechs Customer Service Department at: Phone: (734) 741-8868, and press Option 8, or visit their webpage www.L-3com.com/eotech Email: general@L-3com.com
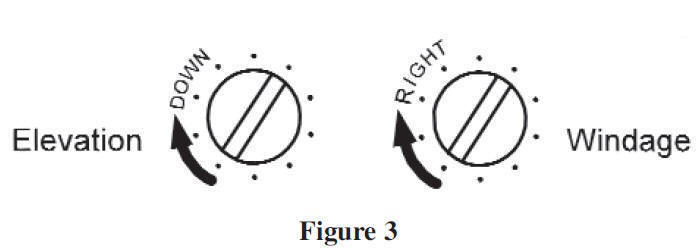
To Ensure proper operation of the push button switches we recommend pressing firmly on the center of the switch If your HWS should need repair, please contact EOTech's Customer Service Department at the number shown above to receive a return authorization number for repair. Send the sight and return authorization number to the address above and include your name, address, and telephone number, as well as a written description of the problem you are encountering. Also, include your receipt at the time of purchase. Whenever possible, ship the sight in its original box. The HWS is equipped with mounting hardware to attach to a standard 1" dovetail or Picatinny (MIL-STD-1913) style rail. To achieve the best results and accuracy, the HWS must be mounted properly. The rail needs to be as parallel as possible to the bore to permit the maximum elevation and windage adjustments. We strongly recommend you have the rail installed by a qualified gunsmith. To mount the sight, please follow these steps. The elevation and windage adjustments are shown in Figure 3. For both elevation and windage, each click will change the bullets point of impact 1/2 Minute of Angle (MOA), which translates to 1/4 inch at 50 yards (0.64 cm at 45.7 m), 1/2 inch at 100 yards (1.3 cm at 91.5 m). Also, one full rotation of either knob will change your point of impact 10 MOA. This translates into 5 inches at 50 yards (12.7 cm at 45.7 m), 10 inches at 100 yards (25.4 cm at 91.5 m). To move the point of impact UP, turn the elevation adjustment screw counterclockwise; to move the point of impact DOWN, turn the elevation adjustment screw clockwise. |
||||||||||||||||||||||||||||||||||||||||||||||||||||||||||||||||||||
EOTech's Frequently Asked Questions PageHWS FeaturesElectronic Features
The HWS uses state-of-the-art digital electronics design. Twenty brightness levels (plus 10 additional NV settings) ensure proper brightness control in either low light or very bright sunlight. An on-board microprocessor provides automatic battery check indicator, up/down brightness scrolling and programmable auto shutdown features. All electronics are fully encapsulated in shock absorbing resin compound. The HOLOgraphic AdvantageThe holographic patterns have been designed to be instantly visible in any light, instinctive to center regardless of shooting angle, and to remain in view while sweeping the engagement zone. Reticles are designed as large, see-through patterns to achieve lightning quick reticle to target acquisition without covering or obscuring the point of aim. |
||||||||||||||||||||||||||||||||||||||||||||||||||||||||||||||||||||
Heads Up, Full View
The HWS employs a true Heads-Up Display that eliminates blind spots, constricted vision, or the tunnel vision associated with tube sights. All user controls are flush to the HWS's streamline housing with no protruding knobs, battery compartments or mounting rings blocking vision at the target area. True, 2 eyes open shooting is realized. Instant threat identification is achieved by maximizing the operator's peripheral vision and ultimately gaining greater control of the engagement zone. |
||||||||||||||||||||||||||||||||||||||||||||||||||||||||||||||||||||
|
|
||||||||||||||||||||||||||||||||||||||||||||||||||||||||||||||||||||
|
HWS Benefits |
||||||||||||||||||||||||||||||||||||||||||||||||||||||||||||||||||||
Extreme DurabilityThe HWS has been designed and tested to provide consistent, reliable performance even in the most hostile operational environments. It is waterproof, fog proof, shockproof, and temperature proof. The HWS is designed to withstand Mil-Spec drop tests and still remain fully operational and hold zero. The HWS has been extensively tested in a punishing recoil simulator generating 3,500 G's of acceleration in less than 0.5 milliseconds (the recoil of a .454 Casull revolver) as well as various environmental chambers). The Heads Up Display is constructed with a 3 layer, shatterproof laminate glass that is 3/16" thick for added durability. Additional protection of the Heads Up Display is provided with a "roll bar" ruggedized hood. |
||||||||||||||||||||||||||||||||||||||||||||||||||||||||||||||||||||
No Revealing Signature
|
||||||||||||||||||||||||||||||||||||||||||||||||||||||||||||||||||||
|
The HWS does not emit any muzzle side position revealing light signature...the projected reticle pattern is visible only to the operator. Even Gen III night vision equipment cannot detect muzzle side signature of the operator's position. All optical surfaces are flat and treated with anti-reflective coatings eliminating additional muzzle side signature due to reflective glare. No need for costly glare elimination filters that reduce the effective light transmission and further dim the target area. |
||||||||||||||||||||||||||||||||||||||||||||||||||||||||||||||||||||
|
How to make a Hologram
Holography is described scientifically as a wave front reconstruction process. Unlike a camera which forms and records the two-dimensional image of an object on film, a hologram records and reconstructs the light field propagating from a three-dimensional object to the viewer. A good analogy is the recording and play back of sound. The sound waves (e.g. music) are encoded and recorded on a disk. Upon proper decoding, the original sound waves are reconstructed. With holography, the field is encoded in the form of an interference pattern and recorded as refractive index variations on a clear window. The decoding is achieved by illuminating the hologram with laser light and the light field that was propagating from the object scene to the hologram window is reconstructed. Thus, a viewer cannot tell if the three-dimensional image he sees is "live" or a holographic reconstruction. The Holographic sight makes use of the capability of a hologram to construct a three-dimensional image to produce a reticle that is projected out to the target plane. This is achieved by using a large, high quality aberration free lens to project the pattern as illustrated. The reticle image could be of any light pattern, any geometric shape or size, and produced in either 2 dimensional or 3 dimensional form. The holographic reticle is uniformly bright and distortion-free regardless of image size. A parallax free image is created with a large and bright aiming pattern allowing quick target acquisition, particularly in close quarter combat situations. At the same time, the HWS can produce an aim point as small as the human eye can resolve to achieve the highest aiming accuracy possible without magnification. |
||||||||||||||||||||||||||||||||||||||||||||||||||||||||||||||||||||
|
|
||||||||||||||||||||||||||||||||||||||||||||||||||||||||||||||||||||
|
|
||||||||||||||||||||||||||||||||||||||||||||||||||||||||||||||||||||
|
Home | Contact Us | About KERIF | Export Regulations | How to Order
sales@nitevis.com or sales@kerifnv.com
|
||||||||||||||||||||||||||||||||||||||||||||||||||||||||||||||||||||
 The Magic of Holography